# Sharepoint Integration

## Generate ClientID and SecretKey which never expires

#### <span style="text-decoration: underline;">Create a Sharepoint App</span>

### Step 1 : Register the Add-In

1. Log in with an admin account on the parent site, and then go to the following URL: [https://sitename.sharepoint.com/sites/subsitename/\_layouts/15/appregnew.aspx](https://sitename.sharepoint.com/sites/subsitename/_layouts/15/appregnew.aspx)<span style="text-decoration-line: underline;"> </span>

- **For sites**: Replace the `<sitename>` in the above URL with your site name.  
    For example, if your SharePoint site is https://abcd.sharepoint.com, then replace the `<sitename>` with **udialog**.
- **For subsites**: To add subsites, append your subsite name to the site URL.  
    For example, if your subsite URL is of the form: https://udialog.sharepoint.com/sites/CloudToolzTesting, then the above URL is [https://udialog.sharepoint.com/sites/CloudToolzTesting/\_layouts/15/appregnew.aspx](https://udialog.sharepoint.com/sites/CloudToolzTesting/_layouts/15/appregnew.aspx)

2. Enter the following information on the page that is displayed when you first visit the URL.  
    [![image.png](https://docs.zentso.com/uploads/images/gallery/2024-04/scaled-1680-/S3I1heOc4zjNqR95-image.png)](https://docs.zentso.com/uploads/images/gallery/2024-04/S3I1heOc4zjNqR95-image.png)

- In the **App Information** section, click the **Generate** button next to the **Client Id** and **Client Secret text** boxes to generate the respective values.
- In the **Title** textbox, enter the **Add-In**.
- In the **App Domain** text box, enter the **localhost**.
- In the **Redirect URL** text box, enter **[https://localhost](https://localhost)**

3. Click **Create**. The Add-in is registered, and the following message is displayed. [![image.png](https://docs.zentso.com/uploads/images/gallery/2024-04/scaled-1680-/hTTgvLXTeJ9eXCEx-image.png)](https://docs.zentso.com/uploads/images/gallery/2024-04/hTTgvLXTeJ9eXCEx-image.png)

### Step 2: Grant Permissions for the Add-in

Once the Add-In is registered, the next step is to set the permissions for that add-in to access the SharePoint data.

- Go to the following URL in the browser. 
    - **For sites**: Replace the `<sitename>` in the above URL with your site name.  
        For example, if your SharePoint site is https://**udialog**.sharepoint.com, then replace the `<sitename>` with **udialog**.
    - **For subsites**: To add subsites, append your subsite name to the site URL.  
        For example, if your subsite URL is of the form: https://**udialog**.sharepoint.com/sites/**CloudToolzTesting**, then the above URL is [https://udialog.sharepoint.com/sites/CloudToolzTesting/\_layouts/15/appinv.aspx](https://udialog.sharepoint.com/sites/CloudToolzTesting/_layouts/15/appinv.aspx)
    
      
    This redirects to the Grant permission page. [![image.png](https://docs.zentso.com/uploads/images/gallery/2024-04/scaled-1680-/kcpB8t54KzBwkzKO-image.png)](https://docs.zentso.com/uploads/images/gallery/2024-04/kcpB8t54KzBwkzKO-image.png)
- Enter the Client ID (which you have generated earlier) in the **App Id** textbox, and click the **Lookup** button.
- [![image.png](https://docs.zentso.com/uploads/images/gallery/2024-04/scaled-1680-/jl6hyR2kVAbRbrkx-image.png)](https://docs.zentso.com/uploads/images/gallery/2024-04/jl6hyR2kVAbRbrkx-image.png)
- In the **App's Permission Request XML** section, enter the following permission request in XML format.
- ```xml
    <AppPermissionRequests AllowAppOnlyPolicy="true">
    <AppPermissionRequest Scope="http://sharepoint/content/sitecollection/web" Right="FullControl"/>
    </AppPermissionRequests>
    ```
- Click **Create**.
- Click **Trust It** to trust the add-in to read items from your website.

**Note:** The Client ID (or App ID) and client secret registered through SharePoint Online’s **/\_layouts/15/AppRegNew.aspx** has a validity of 1 year.

### **Extend the validity of the App**

##### Here are the steps to execute a PowerShell script to extend the validity of a given app's client secret by 100 years::  


### **Step 1:**  Open Windows PowerShell as administrator:

[![image.png](https://docs.zentso.com/uploads/images/gallery/2024-04/scaled-1680-/5L8k5VF48KK1geV6-image.png)](https://docs.zentso.com/uploads/images/gallery/2024-04/5L8k5VF48KK1geV6-image.png)

### **Step 2:** Put the script from below and press Enter:

<p class="callout info">**Note:** Please paste your current SharePoint Client ID and secret key ($ClientID, $ClientSecret) (which you have generated earlier) to the script.</p>

```powershell
if (!(Get-Module AzureAD))
{
  try
  {
    Install-Module AzureAD -Confirm:$false -Force -ErrorAction Stop
    import-module AzureAD
  }
  catch
  {
    $Error[0]
  }
}

# Parameters
$ClientID = "6b78b55e-b8bf-4303-90ae-5c50efe14b94"
$ClientSecret= "NT38Q~vlknvnYk9H._8JcQ4mgsczaqpvWWj7yda0"

# Connect to AzureAD
Connect-AzureAD

# Get the Client ID
$App = Get-AzureADServicePrincipal -All $true | Where-Object {$_.AppID -eq $ClientID}

# Get the Current Expiry Date
$CurrentExpiryDate = (Get-AzureADServicePrincipalPasswordCredential -ObjectId $App.ObjectId).EndDate
Write-host "Current Expiry Date:" $CurrentExpiryDate -BackgroundColor Green

# Extend the validity of the App by 100 years
$StartDate = Get-Date
$EndDate = $StartDate.AddYears(100)
New-AzureADServicePrincipalPasswordCredential -ObjectId $App.ObjectId -StartDate $StartDate -EndDate $EndDate -Value $ClientSecret
New-AzureADServicePrincipalKeyCredential -ObjectId $App.ObjectId -StartDate $StartDate -EndDate $EndDate -Value $ClientSecret

# Get the New Expiry Date
$CurrentExpiryDate = (Get-AzureADServicePrincipalPasswordCredential -ObjectId $App.ObjectId).EndDate
Write-host "New Expiry Date:" $CurrentExpiryDate -BackgroundColor Green
```

[![image.png](https://docs.zentso.com/uploads/images/gallery/2024-04/scaled-1680-/PAr5UxdYx4aLxJQt-image.png)
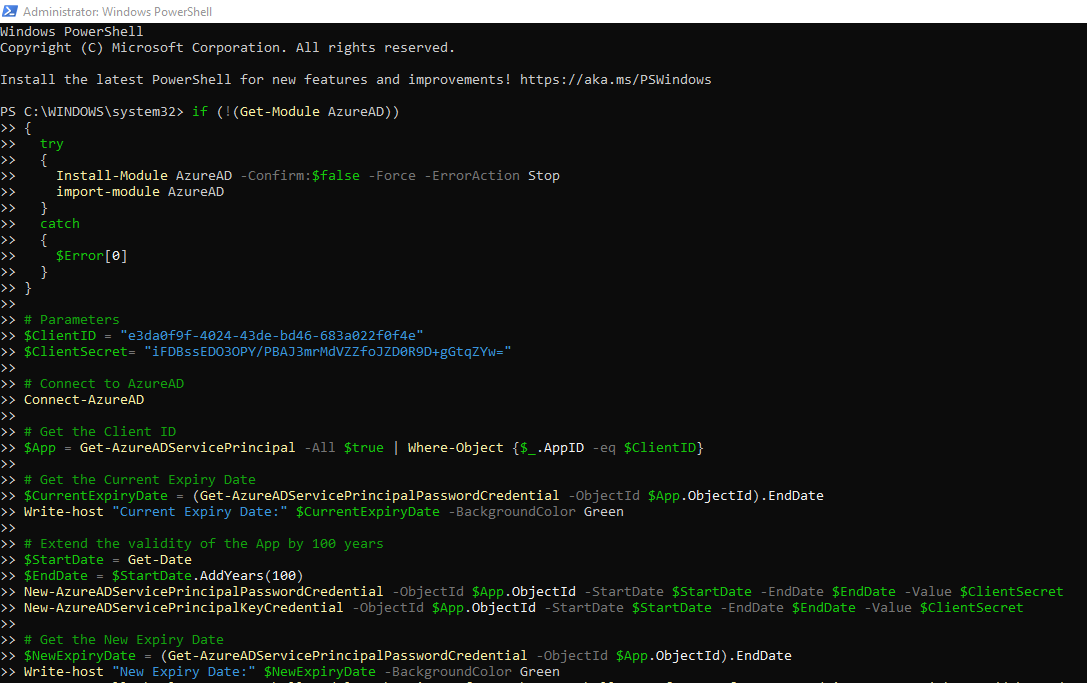
](https://docs.zentso.com/uploads/images/gallery/2024-04/PAr5UxdYx4aLxJQt-image.png)

### **Step 3:** Enter credentials of user with Global Admin permissions to Office 365 tenant:

[![image.png](https://docs.zentso.com/uploads/images/gallery/2024-04/scaled-1680-/8Q6MNifOexXMIxT3-image.png)](https://docs.zentso.com/uploads/images/gallery/2024-04/8Q6MNifOexXMIxT3-image.png)

[![image.png](https://docs.zentso.com/uploads/images/gallery/2024-04/scaled-1680-/39UL1OPJZr23UXDe-image.png)
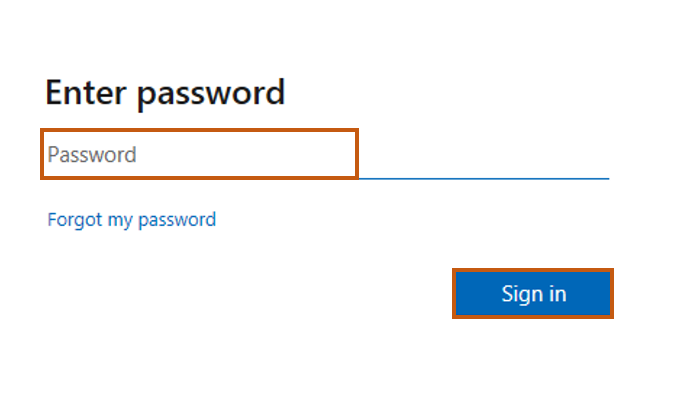
](https://docs.zentso.com/uploads/images/gallery/2024-04/39UL1OPJZr23UXDe-image.png)

### **Step 4:** Find expression End Date property in the output of the script:

[![image.png](https://docs.zentso.com/uploads/images/gallery/2024-04/scaled-1680-/XaluP5Pw9KbLn6f6-image.png)
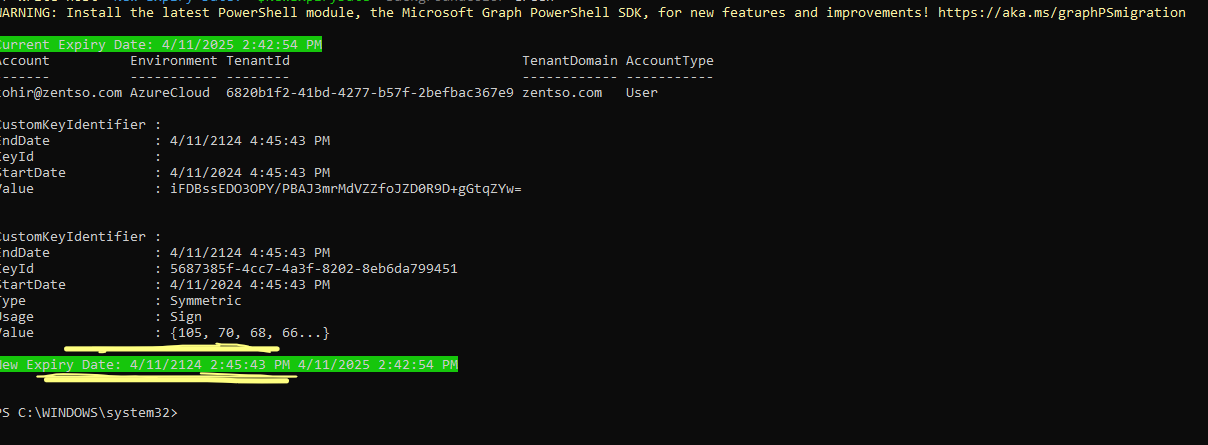
](https://docs.zentso.com/uploads/images/gallery/2024-04/XaluP5Pw9KbLn6f6-image.png)